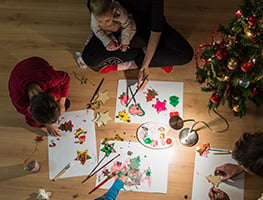


Making Christmas craft with your little one has the potential to be very special time. The craft can then be used as a memento of you having spent some meaningful time together, or as gifts for family and friends.
In order for Christmas craft time to be a positive experience for you and your little one, it is important to choose a craft that is age appropriate for them. Otherwise you can end up with tears and a disastrous mess.
The collective wisdom and suggestions of Huggies® moms and dads means there are some great Christmas craft activities you can carry out with your little one. We’ve also introduced some new ideas that you can use as wrapping paper for your Christmas presents or even to decorate your front door.
It’s always sensible to organise everything before you start any Christmas craft activity with your little one. They usually need constant supervision so it isn’t sensible to dash off midway through to get something you need. Always make sure you have all the required materials close at hand. It’s convenient to have some some Huggies® Baby Wipes handy to clean up any spills and messy little hands.
Christmas craft with baby
Realistically at this age, any Christmas craft with baby is going to be challenging. So it’s best to focus on making something that doesn’t involve too much input from them and a minimum amount of materials.
A Christmas star is a very popular way to make sure your baby is front and centre this Christmas, while at the same time keeping their involvement in the process fairly minimal.
Christmas star
Equipment:
Scissors
Cardboard
Photos of your child
Glue
Glitter or spray paint
String or ribbon
Directions:
Cut two star shapes out of cardboard.
Then cut a circle out of the middle of each of the two stars.
Decorate the stars with glitter, glitter glue, or paint. Set aside to dry.
Take two photos of your child and place them on the backside of each star, making sure the photo is showing through the decorated side of the star, like a photo frame. Sticky tape or glue the photos in place.
Glue the photos & stars back-to-back and let dry.
Then give them to a relative for Christmas.
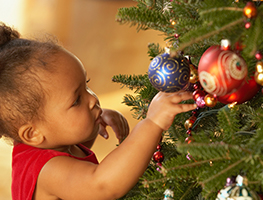
Christmas craft with 1-2 year olds
This is a great age to set up some short Christmas craft activities together. Your little one will usually be super keen to be involved initially and tend to leave you to clean up the mess at the end!
Regardless, it’s a good way to take some time out from the craziness of the Christmas season and enjoy being with your little one.
Home-made Christmas paper
Equipment:
Roll of brown paper
Flat sponges cut into Christmas shapes, e.g. Christmas tree or Christmas star (you can buy various shapes at craft shops)
Washable paint in blue and green
Aprons for you and your little one
Directions:
Pour some washable paint into some shallow bowls.
Cut out some large blocks of the paper.
Make the sponges damp.
Help your little one to dip the dampened sponges into washable paint, then press onto the cut out paper in every direction.
Leave to dry.
You can then use these as wrapping paper for gifts.
Jingle Bells
Equipment:
Egg carton
Washable paint
Glitter
Glue
Wool
Directions:
Cut the egg carton into individual pieces that hold the eggs.
Let your little one paint each of the cut-up containers.
Once they are dry, spread some glue over them. Your little one can then sprinkle the glitter all over them.
Poke a hole through the top of each container and wind the wool through loosely to make a collection of “jingle bells.”
It makes a great decoration for the front door!
Craft ideas with 2-3 year olds
This is a fabulous age to do Christmas craft. They usually have a good understanding of the Christmas season and will be keen to get involved as much as possible. Doing Christmas craft together is a great way to channel their enthusiasm.
You can always start simple by doing some colouring in together.
Christmas fridge magnets
Equipment:
1 cup corn flour
1¼ cups cold water
2 cups bicarbonate of soda
Saucepan
Plate
Damp cloth
Cookie cutters
Rolling pin
Acrylic paints
Paint brush
Acrylic spray glue
Used magnets from old fridge ads/calendars
Directions:
Make craft clay by combining corn flour, water and bicarbonate of soda in a saucepan; stir over medium heat for approximately 4 minutes until it is a moist mashed potato consistency (food colour may be added for coloured clay).
Remove from heat, turn onto a plate, and cover with a damp cloth until cool.
Knead until smooth.
Shape as desired or roll out and shape with cookie cutters (may be stored for later use in an airtight container).
Let dry overnight.
Paint with paints.
Spray over the top with spray paint to seal.
Glue used magnets to the back and write a small message.
Rudolph Christmas craft
Equipment:
A polystyrene sphere
Gold chocolate wrapping
Googly eyes
Red pompom
Brown craft pipe cleaners
Magnet
Glue
Instructions:
Wrap the polystyrene ball with the gold paper.
Glue on eyes and pompom.
Make antlers out of the pipe cleaners and glue to the back of the ball.
Glue a magnet to the back of the ball on top of the pipe cleaners.